Guía: How to extract a bugreport from an Android device?
This resource falls under the how-to guides and details the steps required to generate a bugreport, both using the ADB debugging console and through the device’s graphical user interface (GUI). It is an introductory material, complementary to other resources such as the explainer on log-based forensics for Android devices and the guide on how to enable ADB.
We appreciate the collaboration of RSF Security Lab, who provided us with a set of guides and screenshots that enabled the development of this resource.
What is a bugreport and why is it useful?
As the name suggests, a bugreport is a collection of logs and diagnostic information that helps identify and fix errors when developing an Android application. In the context of consent-based forensic analysis, the bugreport is a valuable forensic artifact for Android device triage, including use with the MVT tool. For instance, Amnesty Tech used a similar technique to detect the NoviSpy spyware.
Android natively allows generating bugreports both through the graphical user interface and through the ADB console. Below we include instructions on how to generate a bugreport through both approaches.
What do you need to extract a bugreport?
Below are the requirements for extracting a bugreport using the graphical interface (GUI) and the ADB console.
To extract the bugreport from the GUI, it is necessary to have access to the Android device and to enable developer options. If you are not sure how to enable developer options on your device, consult this how-to guide.
To extract Para extraer un bugreport a través de la consola de ADB es necesario:
- The Android device to be analyzed: Enable Developer Mode and USB Debugging. If needed, consult our guides on enabling Developer Options or on how to enable ADB.
- A computer (Windows, Linux, or macOS): This will be used for the extraction.
- A data transfer cable (phone-to-computer).
Steps to generate a bugreport using the GUI
On most Android devices, it is possible to generate a bugreport without installing additional tools, simply by navigating through the device menus. This is the preferred method when asking a defender to share this forensic artifact remotely.
Do you need to generate bugreports on several devices? Try ADB
Extracting a bugreport using ADB might be quicker and more efficient if you need to extract information from more than one device.
Because of how the Android operating system is developed and the additional customization layers added by each manufacturer, the exact instructions to generate a bugreport vary slightly across manufacturers. Below we present instructions for a few common models and customization layers.
WWhy do instructions vary across devices?
The Android operating system is based on the Android Open Source Project. However, most manufacturers use a propietary version developed by Google, on top of which manufacturers add personalization layers.
Honor Magic 5 Lite (Magic OS)
To generate a bugreport you need access to developer options. If this menu has not yet been enabled, follow these steps to enable developer options on a Honor device.
Once developer options are enabled, follow these steps to generate a bugreport (see Image 1):
- Open Settings
- Navigate to the menu System & Updates
- Go to Developer Options
- Select Create bug report
- Choose Full Report
- Tap “Report”
- When the bugreport is complete, a notification indicating "Bug report captured" will appear. Tap the notification to open the sharing settings.
- You will see a warning message informing about sensitive data. Click Ok
- Select the preferred mechanism and share the bugreport
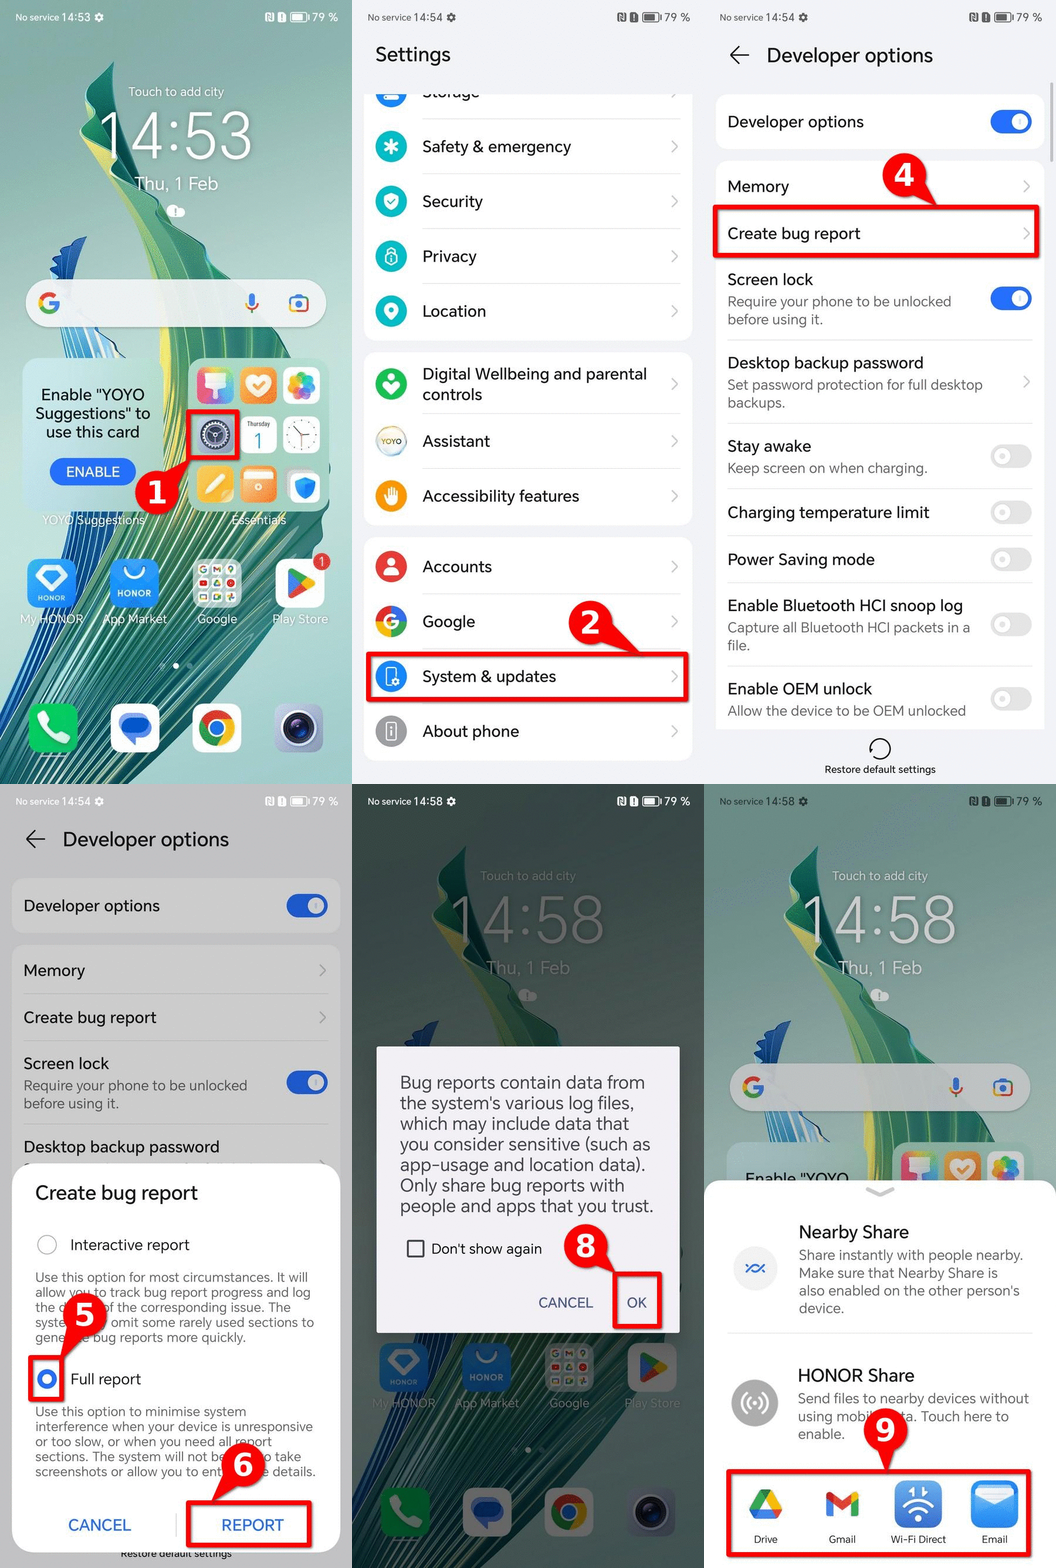
image 1. Steps to generate a bug report on a Honor Magic Lite running Magic OS 7.1.
Motorola (Hello UI)
To generate a bugreport you need access to developer options. If this menu has not yet been enabled, follow these steps to enable developer options on a Motorola device**.
Once developer options are enabled, follow these steps to generate a bugreport (see Image 2):
- Open Settings
- Navigate to the menu System
- Go to Developer Options
- Select Bug report
- Choose Full Report
- Tap “Report”
- When the bugreport is complete, a notification indicating "Bug report captured" will appear. Tap the notification to open the sharing settings.
- You will see a warning message informing about sensitive data. Click Ok
- Select the preferred mechanism and share the bugreport
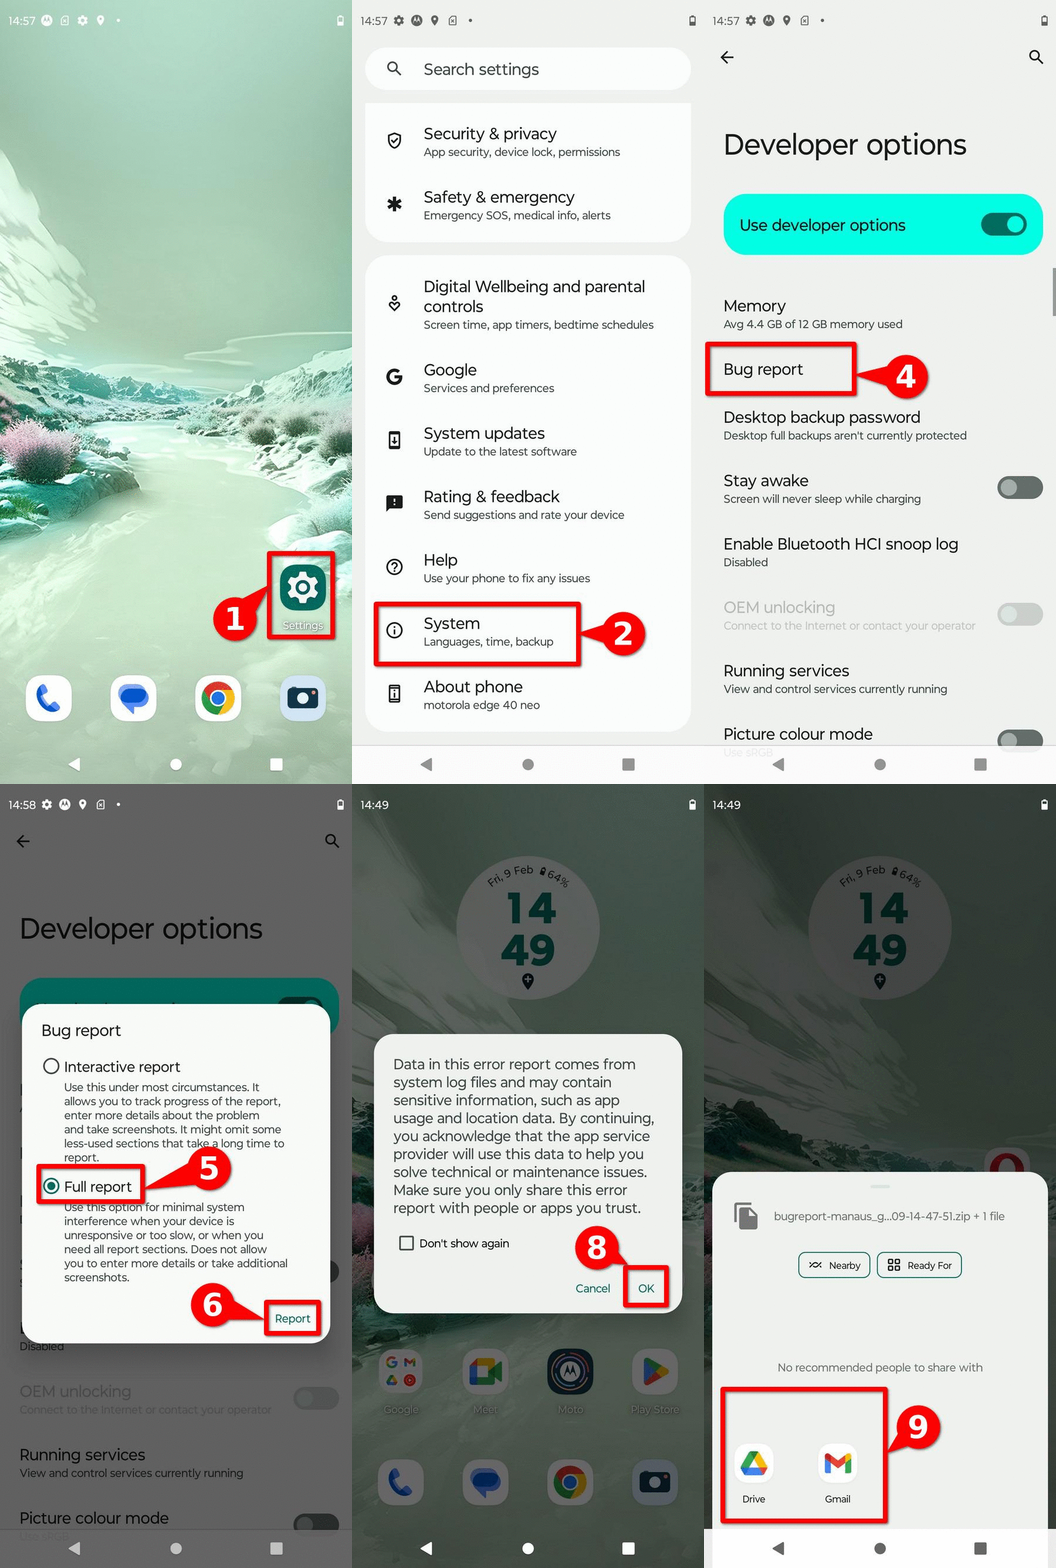
image 2. Steps to generate a bug report on a Motorola Edge Neo 40 running Hello UI.
Nokia
To generate a bugreport you need access to developer options. If this menu has not yet been enabled, follow these steps to enable developer options on a Nokia device**.
Once developer options are enabled, follow these steps to generate a bugreport (see Image 3):
- Open Settings
- Navigate to the menu System
- Go to Developer Options
- Select Bug report
- Choose Full Report
- Tap “Report”
- When the bugreport is complete, a notification indicating "Bug report captured" will appear. Tap the notification to open the sharing settings.
- You will see a warning message informing about sensitive data. Click Ok
- Select the preferred mechanism and share the bugreport
image 3. Steps to generate a bug report on a Nokia G42 5G running Android 13.
Oppo (Magic OS)
To generate a bugreport you need access to developer options. If this menu has not yet been enabled, follow these steps to enable developer options on a Oppo device**.
Once developer options are enabled, follow these steps to generate a bugreport (see Image 4):
- Open Settings
- Navigate to the menu Additional Settings
- Go to Developer Options
- Select Bug report
- Choose Full Report
- Tap “Report”
- When the bugreport is complete, a notification indicating "Bug report captured" will appear. Tap the notification to open the sharing settings.
- You will see a warning message informing about sensitive data. Click Ok
- Select the preferred mechanism and share the bugreport
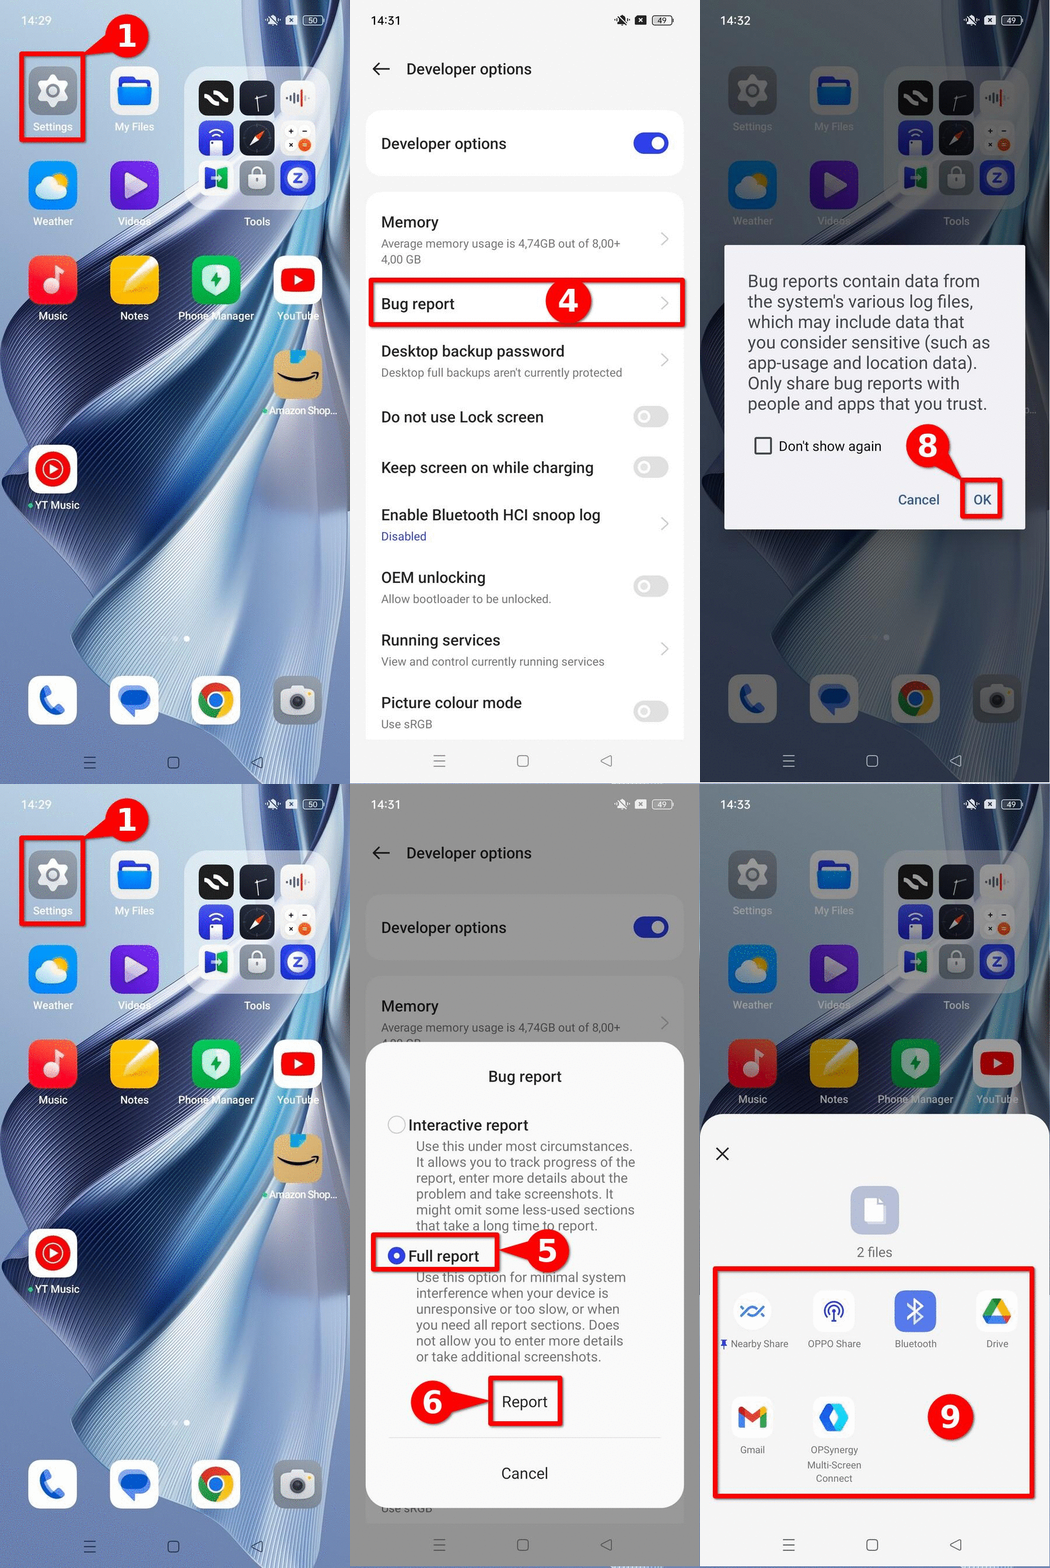
image 4. Steps to generate a bug report on a OPPO Reno 10 running Android 13
Realme (Realme UI)
To generate a bugreport you need access to developer options. If this menu has not yet been enabled, follow these steps to enable developer options on a Realme device**.
Once developer options are enabled, follow these steps to generate a bugreport (see Image 5):
- Open Settings
- Navigate to the menu Additional Settings
- Go to Developer Options
- Select Bug report
- Choose Full Report
- Tap “Report”
- When the bugreport is complete, a notification indicating "Bug report captured" will appear. Tap the notification to open the sharing settings.
- You will see a warning message informing about sensitive data. Click Ok
- Select the preferred mechanism and share the bugreport
image 5. Steps to generate a bug report on a Realme GT2 Pro with RealMe UI 4.0 and Android 13
Samsung (One UI)
To generate a bugreport you need access to developer options. If this menu has not yet been enabled, follow these steps to enable developer options on a Samsung device**.
Once developer options are enabled, follow these steps to generate a bugreport (see Image 6):
- Open Settings
- Go to Developer Options
- Select Bug report
- Choose Full Report
- Tap “Report”
- When the bugreport is complete, a notification indicating "Bug report captured" will appear. Tap the notification to open the sharing settings.
- You will see a warning message informing about sensitive data. Click Ok
- Select the preferred mechanism and share the bugreport
image 6. Steps to generate a bug report on a Samsung Galaxy A54 with One UI and Android 13
Sony (Xperia UI)
To generate a bugreport you need access to developer options. If this menu has not yet been enabled, follow these steps to enable developer options on a Sony device**.
Once developer options are enabled, follow these steps to generate a bugreport (see Image 7):
- Open Settings
- Navigate to the menu System
- Go to Developer Options
- Select Bug report
- Choose Full Report
- Tap “Report”
- When the bugreport is complete, a notification indicating "Bug report captured" will appear. Tap the notification to open the sharing settings.
- You will see a warning message informing about sensitive data. Click Ok
- Select the preferred mechanism and share the bugreport
image 7. Steps to generate a bug report on a Sony Xperia 10V with Xperia UI 4.0 running Android 14.
Tecno (Hi OS)
To generate a bugreport you need access to developer options. If this menu has not yet been enabled, follow these steps to enable developer options on a Tecno device**. .
Once developer options are enabled, follow these steps to generate a bugreport (see Image 8):
- Open Settings
- Navigate to the menu System
- Go to Developer Options
- Select Bug report
- Choose Full Report
- Tap “Report”
- When the bugreport is complete, a notification indicating "Bug report captured" will appear. Tap the notification to open the sharing settings.
- You will see a warning message informing about sensitive data. Click Ok
- Select the preferred mechanism and share the bugreport
image 8. Steps to generate a bug report on a Tecno Spark Go with Hi OS running Android 13.
Xiaomi (Hyper OS)
To generate a bugreport you need access to developer options. If this menu has not yet been enabled, follow these steps to enable developer options on a Xiaomi device.
Once developer options are enabled, follow these steps to generate a bugreport (see Image 9):
- Open Settings
- Navigate to the menu About phone
- Go to Detailed info and specs
- Find the information corresponding to CPU and tap 5 times report
- A notification pop-up will appear warning about personal data in the bugreport. Click Agree
- Tap “Report”
- When the bugreport is complete, a notification indicating "Bug report captured" will appear. Tap the notification to open the file explorer.
- Locate the bugreport that has been just generated, and clikc to open the Sharing settings.
- Select the preferred mechanism and share the bugreport
image 9. Steps to generate a bug report on a Xiaomi 13T.
Steps to generate a bugreport via the ADB console
In addition to the graphical method, it is possible to generate a bugreport via the ADB console. Remember to enable USB debugging before following these steps.
Generate the bugreport
If you only have one device connected, you can obtain a bugreport using the following command:
$ adb bugreport
By default, the report is saved in the local directory. To specify a path you can add the parameter at the end of the command as follows:
$ adb bugreport E:\Reports\MyBugReportsPath
Multiple Devices
If multiple devices are connected, specify the device with the -s option. First, list connected devices using adb devices to obtain the device identifier and generate the bugreport as follows:
$ adb devices
List of devices attached
emulator-5554      device
8XV7N15C31003476 device

$ adb -s 8XV7N15C31003476 bugreport
Extract the bugreport
In order to extract the bugreport, you have to first identify which bugreport to extract. To do this, you can use the command adb shell ls /bugreports/ to see the stored reports on the default location /bugreports/.
$ adb shell ls /bugreports/
bugreport-foo-bar.xxx.YYYY-MM-DD-HH-MM-SS-dumpstate_log-yyy.txt
bugreport-foo-bar.xxx.YYYY-MM-DD-HH-MM-SS.zip
dumpstate-stats.txt
Once you identify the bugreport to extract, you can copy to the local computer using the following command.
$ adb pull /bugreports/bugreport-foo-bar.xxx.YYYY-MM-DD-HH-MM-SS.zip
Conclusión
A bugreport is an error report generated by the Android operating system that contains diagnostic information designed primarily for debugging application errors. However, many of the logs and behaviors included are also useful for forensic analysis. Extracting a bugreport is one of the first steps in an investigation cycle and is a frequent way to begin the triage process on Android devices.
Due to the diversity of manufacturers and Android versions, this guide presents a list of step-by-step instructions to generate a bugreport, to facilitate and promote consent-based forensic analysis in benefit of civil society. Always ensure you discuss and obtain informed consent before extracting forensic information.
If you have access to a graphical interface not captured in this resource and would like to contribute the necessary screenshots to add this resource, you can contact us through an issue or, if you are comfortable with markdown, submit a pull request.
Comments
Do you have any comment or suggestion about this resource? You can use the comment function provided below to leave your ideas, corrections or thoughts. Please make sure to follow our code of conduct when leaving your comment. If you prefer, you can also participate in the discussion directly in the github repository.