How to enable ADB on an Android device?
This resource falls under the how-to guides and presents the steps to enable USB debugging, also known as Android Debug Bridge or ADB, on different Android devices. It also provides a brief explanation of what USB debugging is and why it is useful in digital forensics. This is introductory material, complementary to other resources such as the explainer on log-based forensics for Android devices and the guide on enabling developer options, and is part of the steps to follow when making an acquisition of forensic evidence from an Android device.
We appreciate the collaboration of RSF Security Lab, who provided us with a set of guides and screenshots that enabled the development of this resource.
What is ADB or USB debugging, and why is it useful?
ADB stands for Android Debug Bridge. It is a command-line tool that allows direct communication with an Android device over USB, enabling the execution of various actions and commands.
From a digital forensics perspective, particularly in log-based investigations using tools such as AndroidQF, ADB enables establishing a direct connection with a device. It is useful in situations where physical access to the device is available and when the goal is to obtain information directly from the device using native commands, without relying on additional tools. ADB or USB debugging is also necessary to complete an extraction using AndroidQF.
How to enable ADB?
In most cases, USB debugging or ADB can be found within the Developer Options menu. Therefore, if this menu has not yet been enabled, you should first follow the relevant instructions for enabling it.
The following section provides step-by-step instructions for enabling ADB on different Android models and versions.
Why is ADB enabled differently on Android devices?
The Android operating system is based on the Android Open Source Project. However, most manufacturers use a propietary version developed by Google, on top of which manufacturers add personalization layers.
The following section shows the steps to enable ADB menu on different devices, along with screenshots of the relevant menus for each interface.
Google (Pixel OS)
To enable ADB it is necessary to have access to the developer options menu. If you have not enabled this menu, you can follow these steps to enable developer options on a Pixel device, also shown on image 1.
- Open the device Settings ⚙️
- Navigate to System
- Navigate to Developer Oprtions 🤖**
- Enable the first option USB debugging 🖥️
- Confirm thtat you want to enable USB debugging in the pop-up menu ✅

Image 1. Steps to enable ADB on a Google Pixel running Android 13.
Honor (Magic OS)
To enable ADB it is necessary to have access to the developer options menu. If you have not enabled this menu, you can follow these steps to enable developer options on a Honor device, also shown on image 2.
- Open the device Settings ⚙️
- Navigate to System and Updates
- Navigate to Developer Oprtions 🤖**
- Enable the first option USB debugging 🖥️
- Confirm thtat you want to enable USB debugging in the pop-up menu ✅
Image 2. Steps to enable ADB on a Honor Magic Lite running Magic OS 7.1 and Android 13.
Motorola (Hello UI)
To enable ADB it is necessary to have access to the developer options menu. If you have not enabled this menu, you can follow these steps to enable developer options on a Motorola device, also shown on image 3.
- Open the device Settings ⚙️
- Navigate to System
- Navigate to Developer Oprtions 🤖**
- Enable the first option USB debugging 🖥️
- Confirm thtat you want to enable USB debugging in the pop-up menu ✅
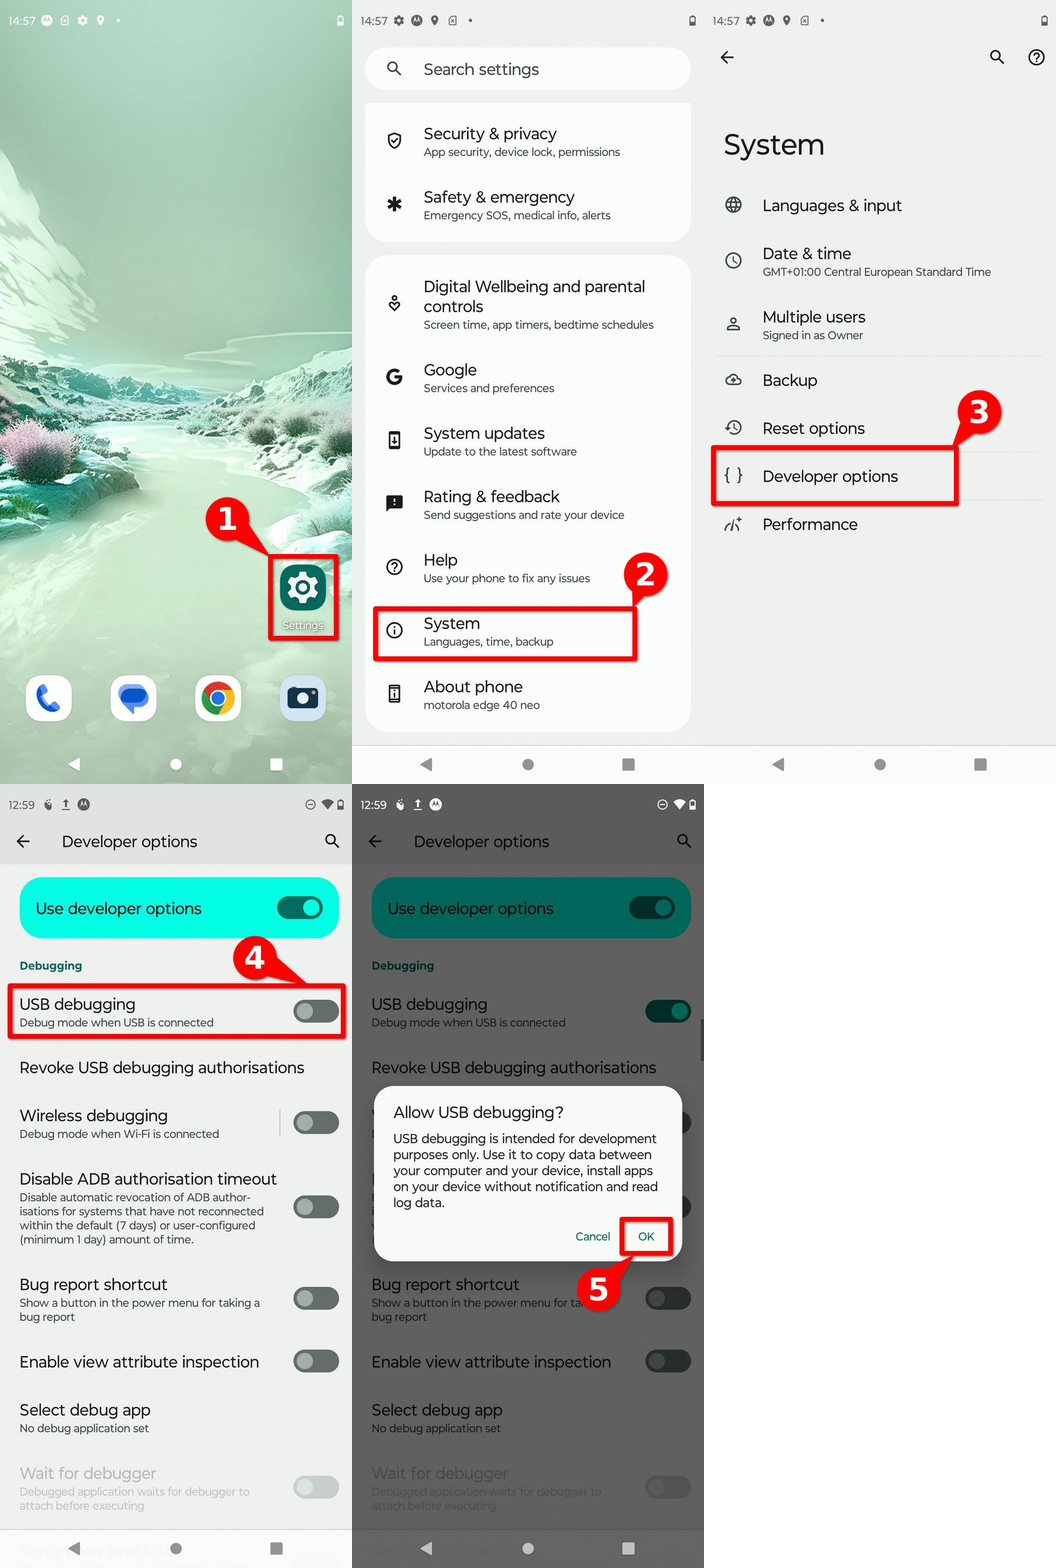
Image 3. Steps to enable ADB on a Motorola Edge Neo 40 running Hi OS and Android 13.
Nokia
To enable ADB it is necessary to have access to the developer options menu. If you have not enabled this menu, you can follow these steps to enable developer options on a Nokia device, also shown on image 4.
- Open the device Settings ⚙️
- Navigate to System
- Navigate to Developer Oprtions 🤖**
- Enable the first option USB debugging 🖥️
- Confirm thtat you want to enable USB debugging in the pop-up menu ✅
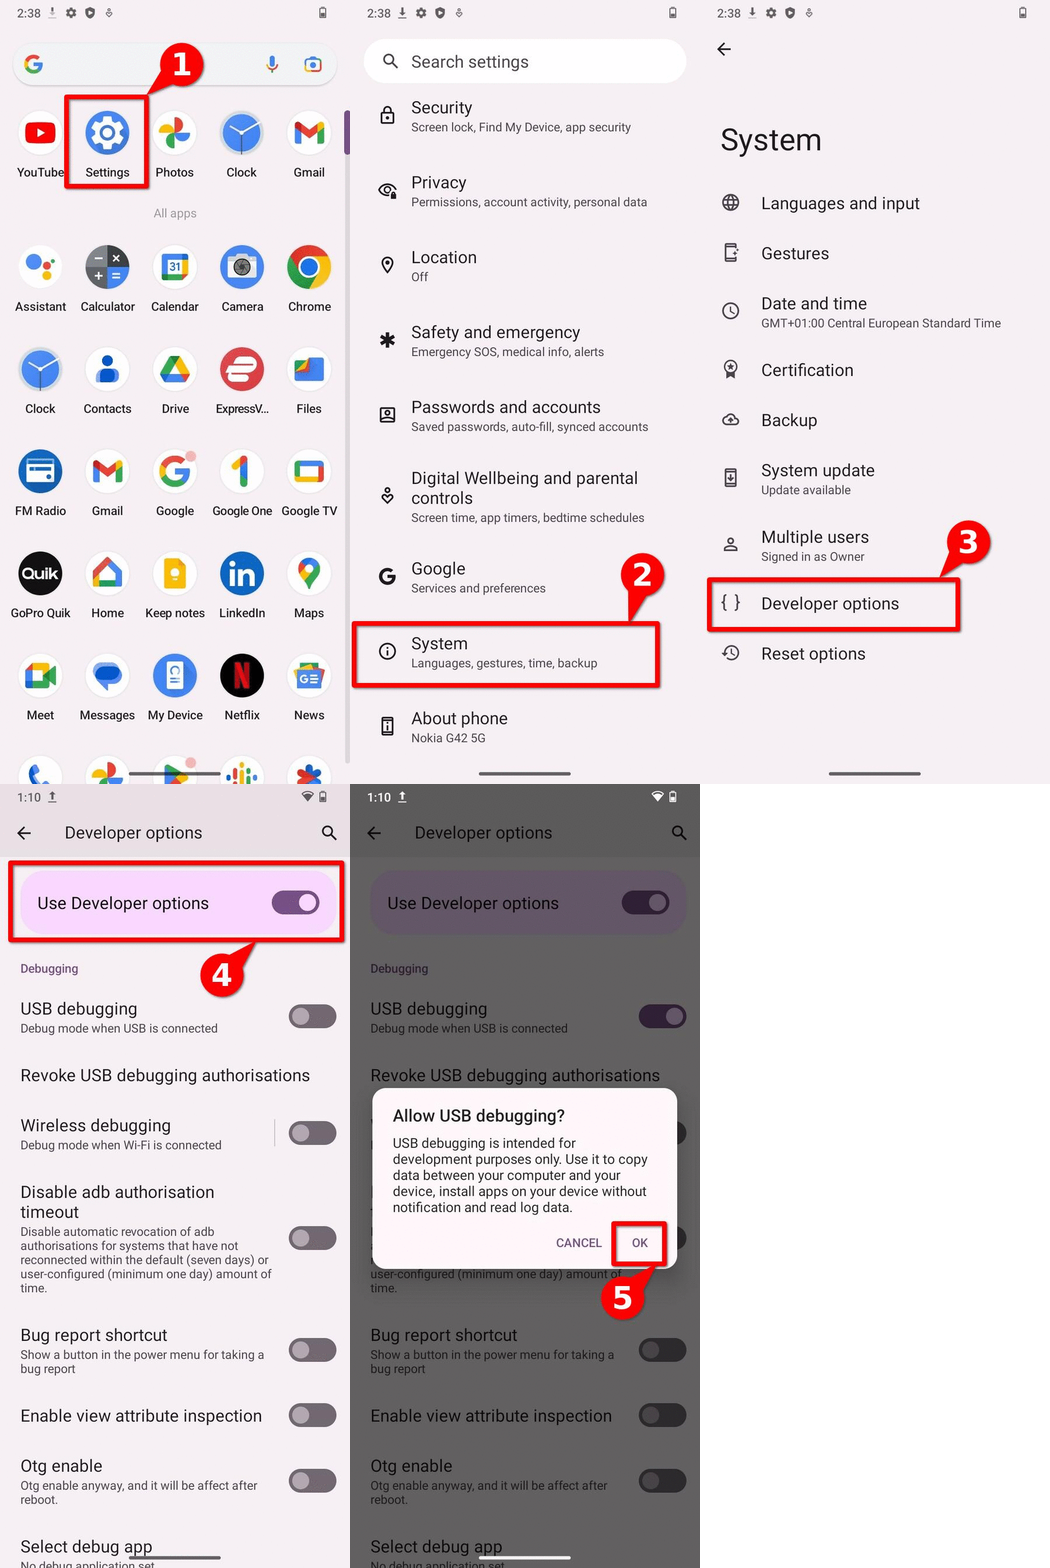
Image 4. Steps to enable ADB on a Nokia G42 5G running Android 13.
Oppo Reno 10 (Color OS)
To enable ADB it is necessary to have access to the developer options menu. If you have not enabled this menu, you can follow these steps to enable developer options on a OPPO device, also shown on image 5.
- Open the device Settings ⚙️
- Navigate to Additional Settings
- Navigate to Developer Oprtions 🤖**
- Enable the first option USB debugging 🖥️
- Confirm thtat you want to enable USB debugging in the pop-up menu ✅
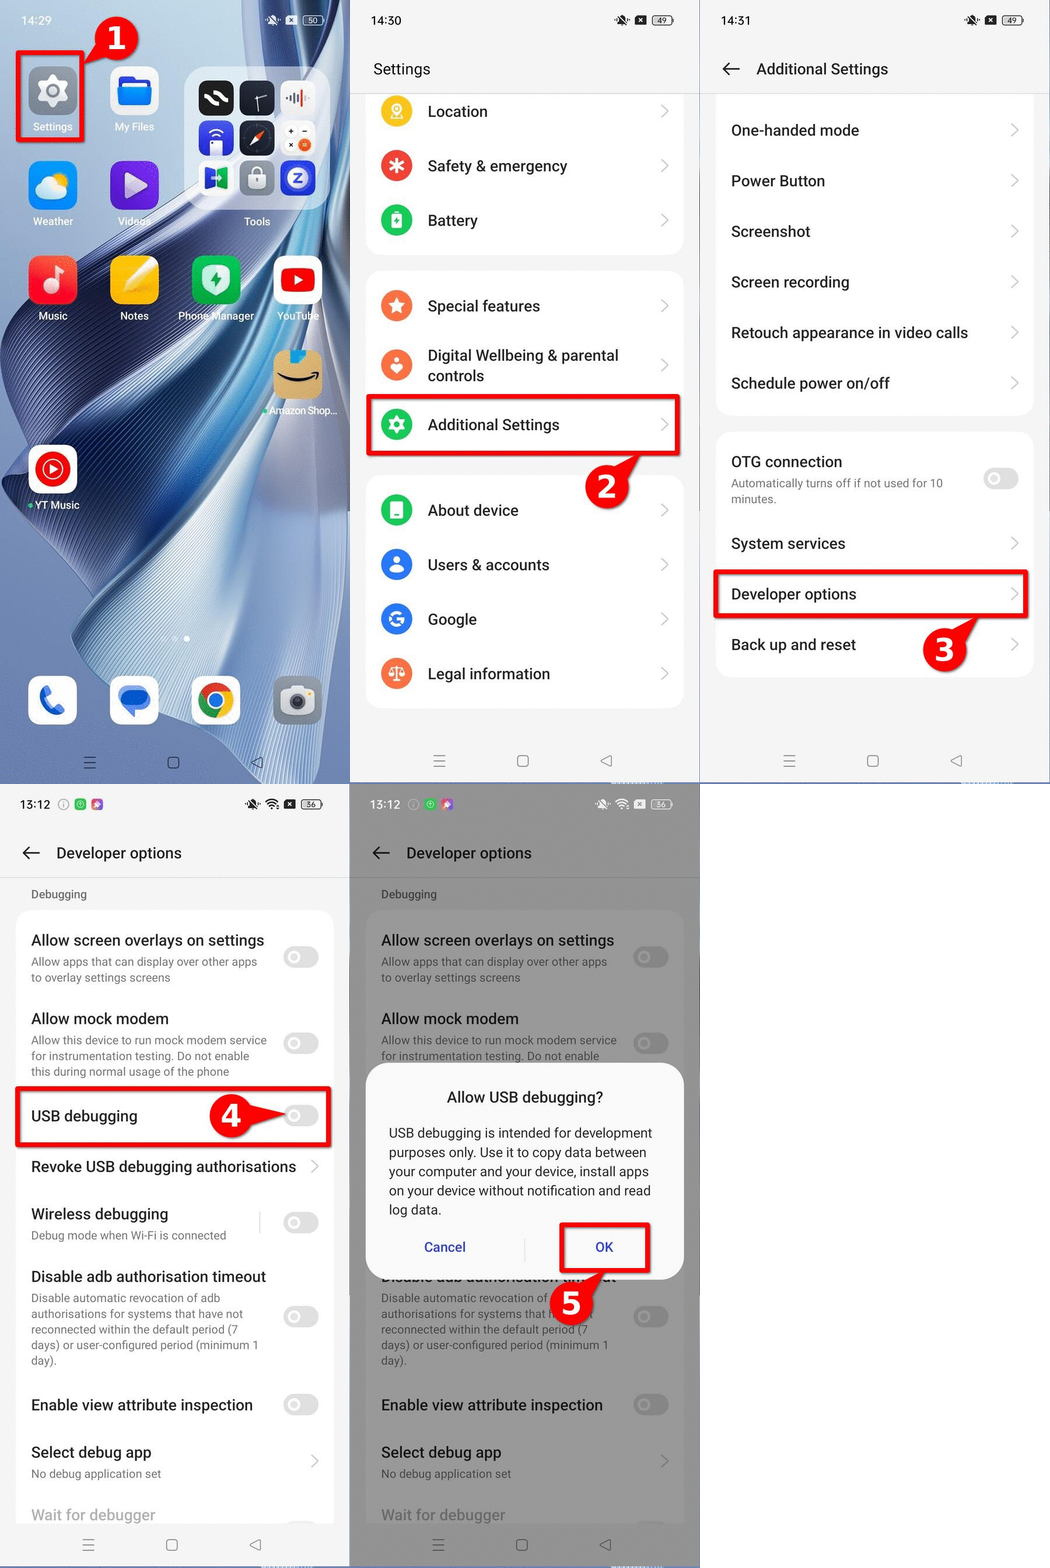
Image 5. Steps to enable ADB on a Oppo device.
Realme (Realme UI)
To enable ADB it is necessary to have access to the developer options menu. If you have not enabled this menu, you can follow these steps to enable developer options on a Realme device, also shown on image 6.
- Open the device Settings ⚙️
- Navigate to Additional Settings
- Navigate to Developer Oprtions 🤖**
- Enable the first option USB debugging 🖥️
- Confirm thtat you want to enable USB debugging in the pop-up menu ✅
Image 6. Steps to enable ADB on a Realme GT2 Pro with RealMe UI 4.0 and Android 13
Samsung (One UI)
To enable ADB it is necessary to have access to the developer options menu. If you have not enabled this menu, you can follow these steps to enable developer options on a Samsung device, also shown on image 7.
- Open the device Settings ⚙️
- Navigate to Developer Oprtions 🤖**
- Enable the first option USB debugging 🖥️
- Confirm thtat you want to enable USB debugging in the pop-up menu ✅
Image 7. Steps to enable ADB on a Samsung Galaxy A54 with One UI and Android 13
Sony (Xperia UI)
To enable ADB it is necessary to have access to the developer options menu. If you have not enabled this menu, you can follow these steps to enable developer options on a Sony device, also shown on image 8.
- Open the device Settings ⚙️
- Navigate to System
- Navigate to Developer Oprtions 🤖**
- Enable the first option USB debugging 🖥️
- Confirm thtat you want to enable USB debugging in the pop-up menu ✅
Image 8. Steps to enable ADB on a Sony Xperia 10V with Xperia UI 4.0 and Android 14.
Tecno (Hi OS)
To enable ADB it is necessary to have access to the developer options menu. If you have not enabled this menu, you can follow these steps to enable developer options on a Tecno Spark device, also shown on image 9.
- Open the device Settings ⚙️
- Navigate to System
- Navigate to Developer Oprtions 🤖**
- Enable the first option USB debugging 🖥️
- Confirm thtat you want to enable USB debugging in the pop-up menu ✅
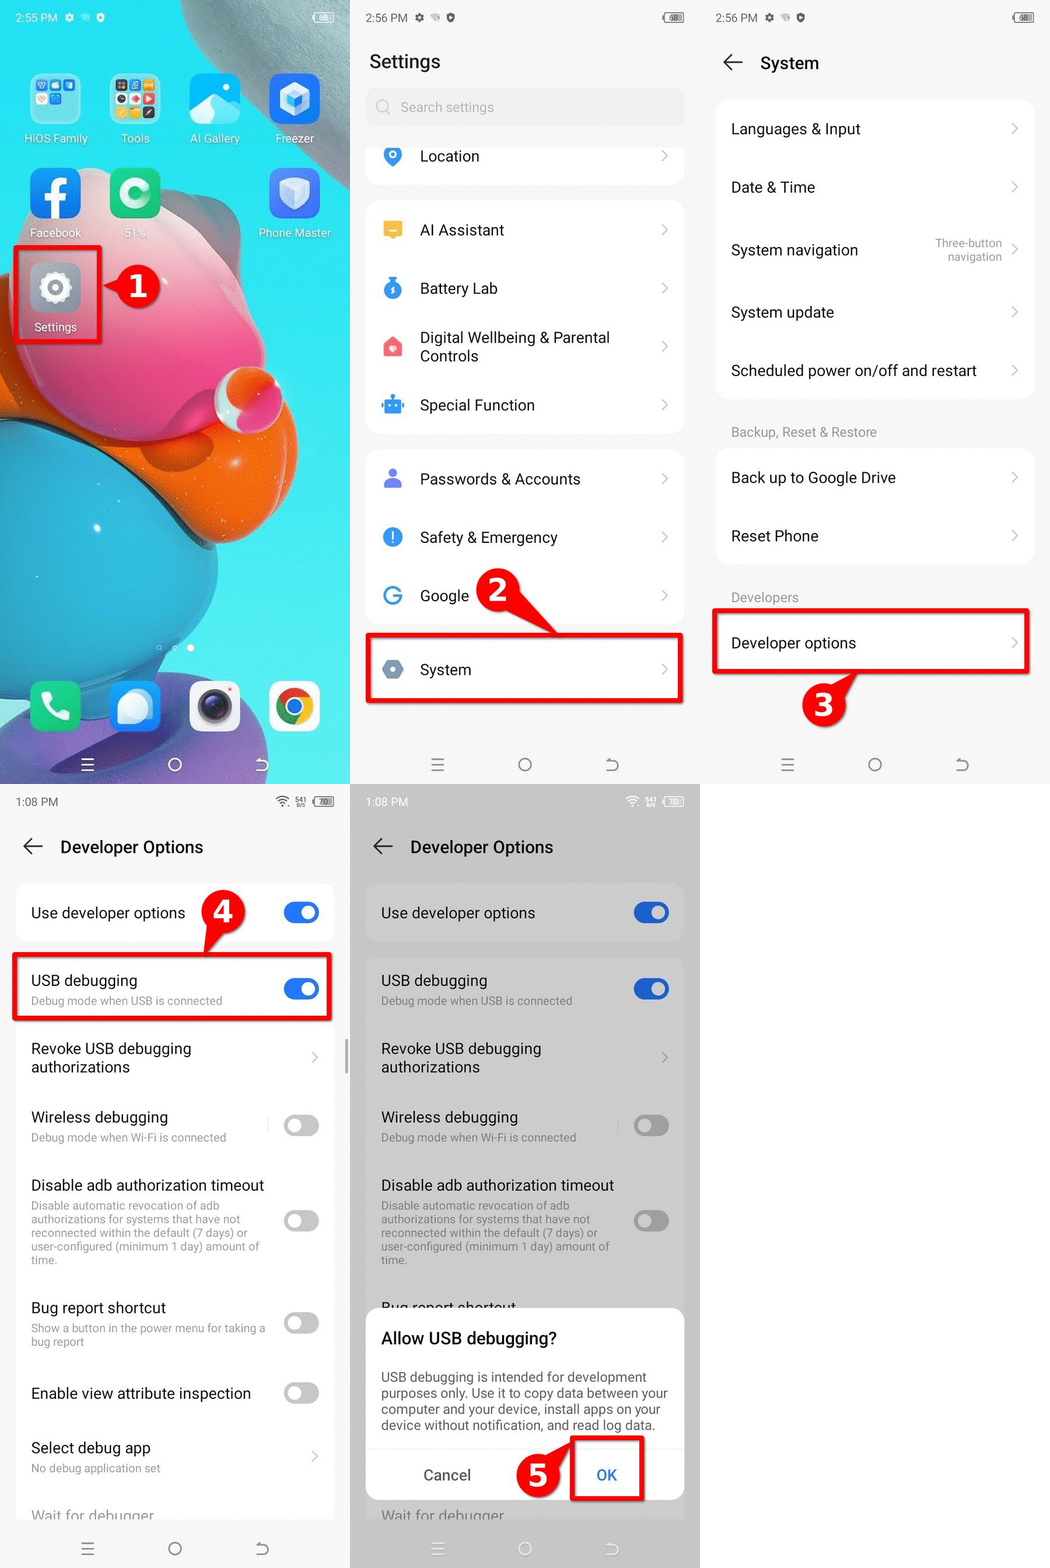
Image 9. Steps to enable ADB on a Tecno Spark Go with Hi OS and Android 13.
Xiaomi (Hyper OS)
To enable ADB it is necessary to have access to the developer options menu. If you have not enabled this menu, you can follow these steps to enable developer options on a Sony device, also shown on image 10.
- Open the device Settings ⚙️
- Navigate to Additional Settings
- Navigate to Developer Oprtions 🤖**
- Enable the first option USB debugging 🖥️
- Confirm thtat you want to enable USB debugging in the pop-up menu ✅
image 10. Steps to enable ADB on a Xiamoi device.
Conclusion
ADB, or Android Debug Bridge, is a native Android command-line tool that allows direct interaction with a device. In forensic analysis contexts, it can be useful for obtaining information that supports triage without the need for third-party tools.
Due to the wide variety of manufacturers and Android operating system versions, this guide presents a list of manufacturers and step-by-step instructions to enable ADB, helping facilitate and promote consent-based forensic analysis in support of civil society.
If you have access to a graphical interface not shown in this list and would like to contribute a screenshot to this resource, you can contact us through an issue or, if you are comfortable with markdown, submit a pull request.
Comments
Do you have any comment or suggestion about this resource? You can use the comment function provided below to leave your ideas, corrections or thoughts. Please make sure to follow our code of conduct when leaving your comment. If you prefer, you can also participate in the discussion directly in the github repository.